Tile Trim Guide: Choosing the Perfect Finish for a Professional Look
Jun 20, 2025 11 minute read
When it comes to completing a tiling project, there’s often one critical detail that’s overlooked: tile finishing trim. This essential element not only visually elevates a tiled surface but also protects exposed edges and corners from wear and water damage. Whether you're working on a kitchen, bathroom, or laundry room, the right border tile will up the style ante of your tilework.
At Apollo Tile, we believe that exceptional design can be found in the smallest details—and with the right trim, your installation will not only look expertly finished but also stand the test of time. That’s why we have come up with a comprehensive guide, exploring the various types of tile trim and offering advice on how to use tile trim and select the right one for your next project.
Types of Tile Trims: Find the Right Style for Your Project
The different types of tile trim define edges, create transitions, and add flair to a tile installation. Whether you want to frame your backsplash tile with an elegant closing detail or protect the edge where the wall meets the floor, below are trim types you should know about:
1. Pencil Tile Trim:
Slender and slightly rounded, pencil tile trim is a minimalist choice resembling the shape of a pencil. Available in glass, ceramic, or marble, it makes an excellent addition as a decorative accent or to outline and frame sections of tiled surfaces.
Best Uses of Pencil Trim:
- Framing intricate mosaics and subway tiles
- Bordering shower niches, backsplashes, and accent walls
- Creating visual separation between different tile styles or patterns
Style Impact of Pencil Tile:
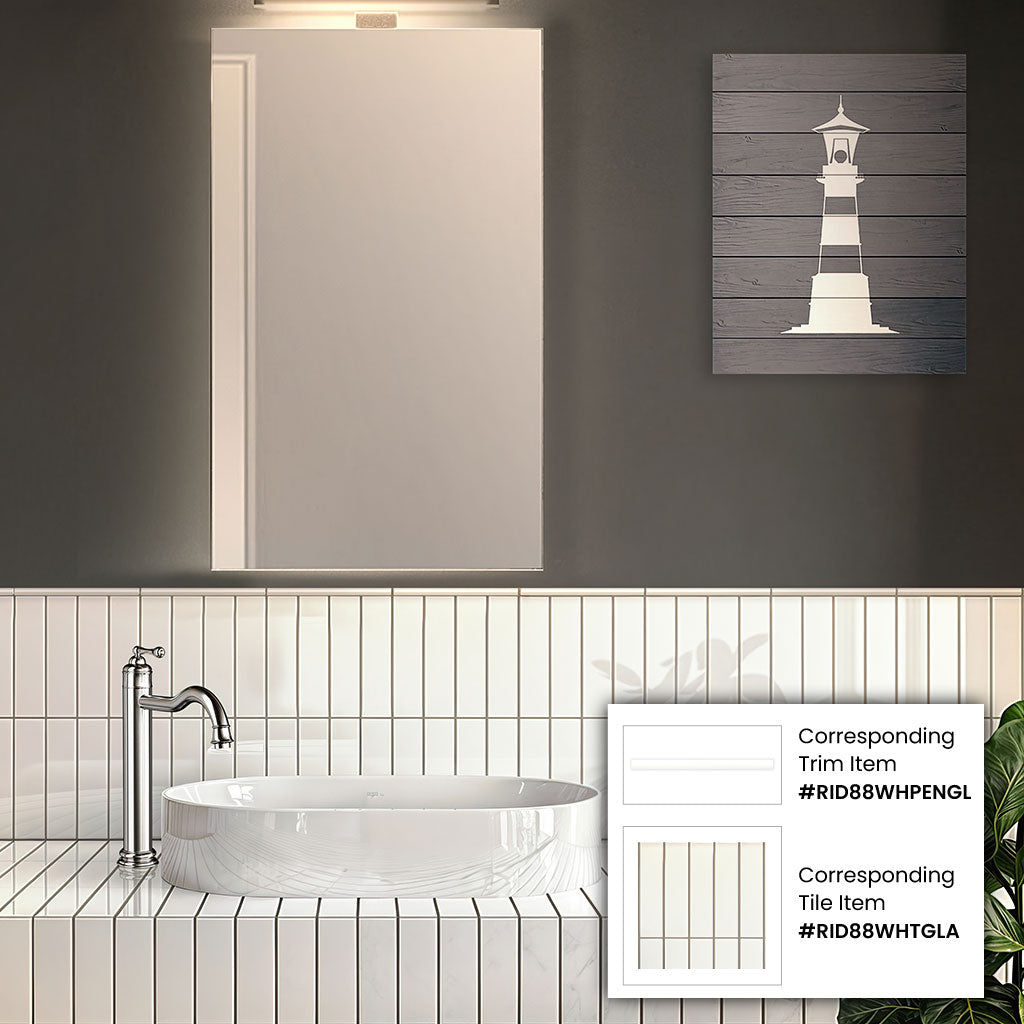
Pencil tile finishing trim is simple in form yet highly functional. It can add depth and dimension to a tiled area without visual overwhelm. Thanks to a variety of materials, pencil flat liners are well-suited for modern and traditional settings. A good example is White 0.5x8 Glossy Ceramic Pencil Tile Trim—a slim, polished accent piece that coordinates beautifully with a wide variety of our subway wall tiles.
2. Bullnose Tile Trim:
For a softer, more rounded finish, bullnose tile trim is the go-to. This sought-after border tile is used across diverse tiling projects due to its versatility and timeless appeal.
Best Uses of Bullnose Trim:
- Finishing the edge of a half-tiled wall or backsplash
- Framing the surrounds of a fireplace, shower, or bathtub
- Transitioning between a tiled surface and a non-tiled surface
Style Impact of Bullnose Trim:
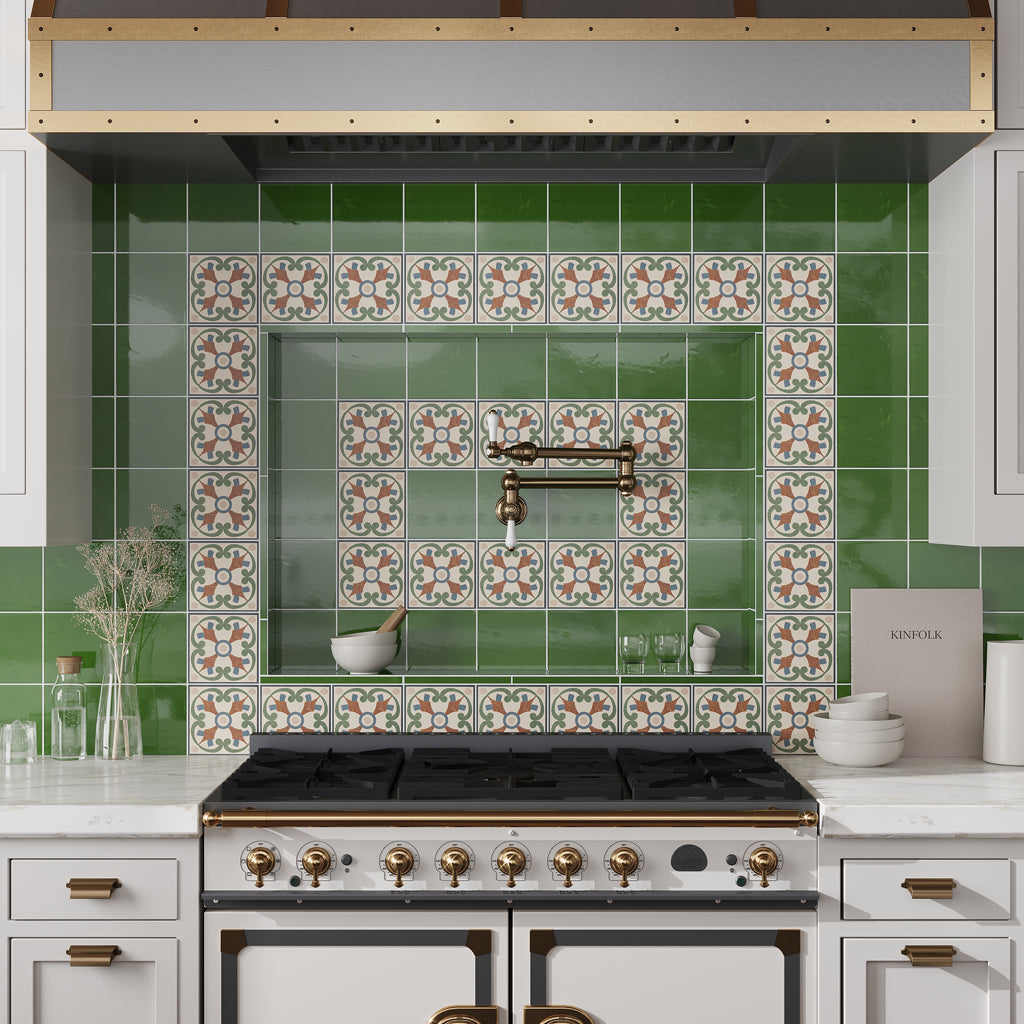
Like pencil liners, bullnose tile trim installation adds a decorative touch to any tilework. Made from ceramic and porcelain, this rounded, convex-edged profile can match the color and glaze of the field tiles it's used with. Our Deep Forest Green 0.6x12 Glossy Porcelain Bullnose Tile Trim complements different styles of tile, including Deep Forest Green 6x6 Glossy Square Porcelain Tile and Terracotta Blue Green 6x6 Matte Square Porcelain Tile.
3. Chair Rail Molding:
Chair rail is a decorative marble molding that creates a horizontal border along the wall. As the name suggests, it was originally used in dining rooms as wainscoting to protect walls from chair bumps. This tile finishing trim now serves as an aesthetic enhancement and decorative divider between tiles of varying patterns or a tiled and a non-tiled surface.
Best Uses of Chair Rail:
- Designing ornate wainscoting-style tile arrangements
- Adding architectural detail to walls and backsplashes
- Elevating vintage or traditional interior design themes
Style Impact of Chair Rail:
The signature feature of chair rail tile finishing trim is that it is larger at the top and narrower at the bottom. At Apollo Tile, we have toned-down designs such as Beige 2x12 Marble Polished Chair Rail Tile Trim, as well as more ornate options like Black 2x12 Polished Marble Chair Rail Tile Trim, so you can get creative with looks that resonate with your space.
4. Baseboard Tile Trim:
To address moisture or wear issues where the wall meets tile flooring, baseboard tile trim is the best solution. Installing these types of tile trim provides a seamless transition between floors and walls, especially in high-traffic areas and bathrooms that require a watertight seal.
Best Uses of Baseboard Trim:
- Finishing the floor edges of tiled bathrooms or laundry rooms
- Guarding against scuffs, bumps, and water intrusion
- Establishing a visually cohesive transition from wall to floor
Style Impact of Baseboard Trim:
Crafted from marble stone such as Carrara, Crema Marfil, Nero Marquina, and Calacatta tile, baseboard trim molding delivers a high-end closing detail that’s equally protective. Consider our White 4x12 Polished Marble Baseboard Crown Tile Trim for a finish that complements different tile styles and sizes, including mosaics and large formats.
How to Choose the Right Tile Trim
When picking tile edge trim, a few factors are key to achieving a polished, durable, and eye-pleasing finish. Below are the essentials to keep in mind:
1. Define Your Aesthetic: Begin by considering the style you want for your space and choose a tile finishing trim that complements that vision. Think about how visible you want the trim to be. Do you want it to stand out as a bold accent or blend in for a streamlined look?
2. Consider Tile Material: The type of tile installed, be it ceramic, porcelain, glass, or natural stone, is important to keep in mind when selecting border tile. Different tiling materials require specific edge profiles. For example, bullnose trims pair well with ceramic or porcelain, while baseboard trims, such as Black 4x12 Polished Marble Baseboard Tile Trim, are better suited for marble flooring. Matching the trim to the tile material improves style and performance.
3. Be Mindful of Trim Size: The thickness of the tiles is yet another critical factor in selecting the correct edge profile. Too thick or too thin a trim can result in uneven edges or protrusions that trap moisture and dirt. For this reason, install tile finishing trim that accommodates tile thickness precisely.
4. Prioritize Long-term Durability: A trim isn’t just decorative; it serves to protect the edges of a backsplash or wall tile from chipping, moisture, and wear. Therefore, it's essential to choose a profile that is resilient, easy to clean, and able to withstand the rigors of daily life. Some border tiles are better suited for external use and coping with the elements, while others can thrive in high-moisture areas. Double-check the trim's suitability for your specific environment before placing an online order.
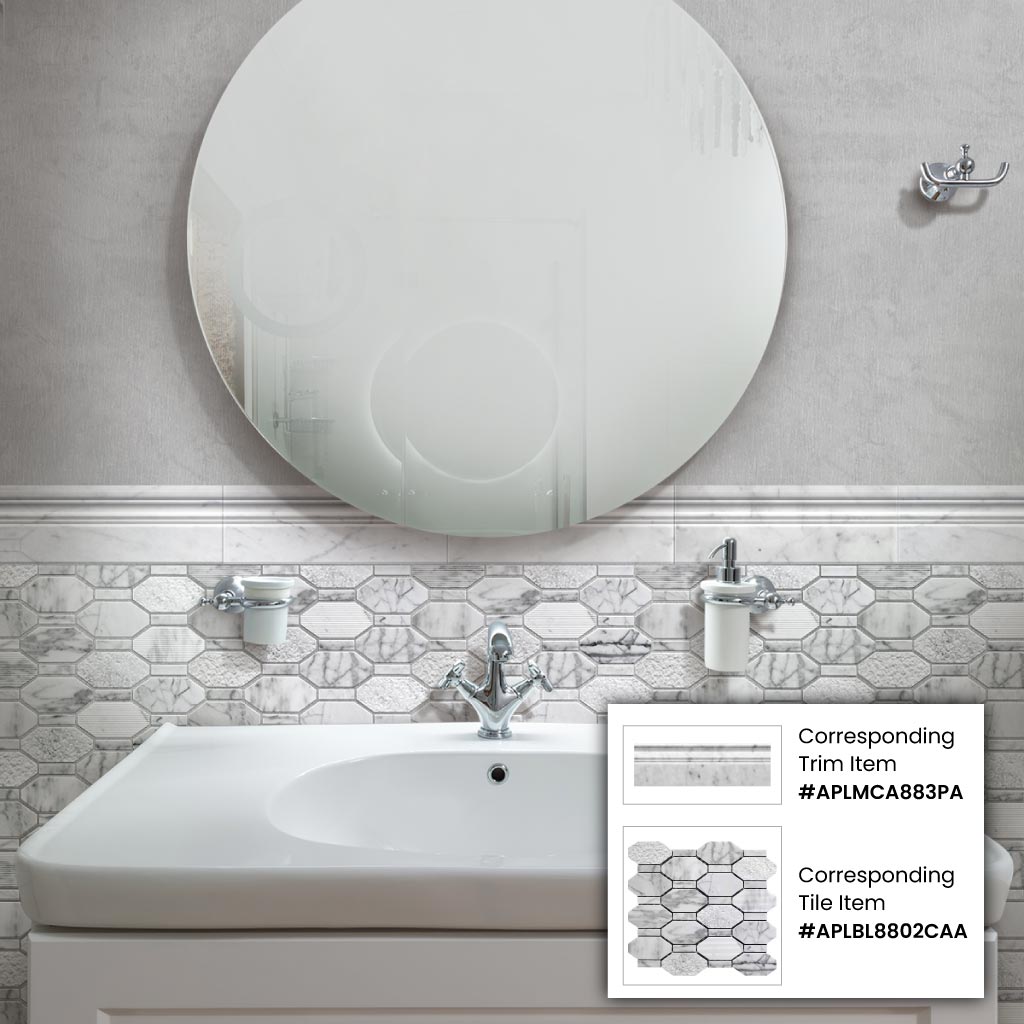
Color and Finish Options for Tile Trim
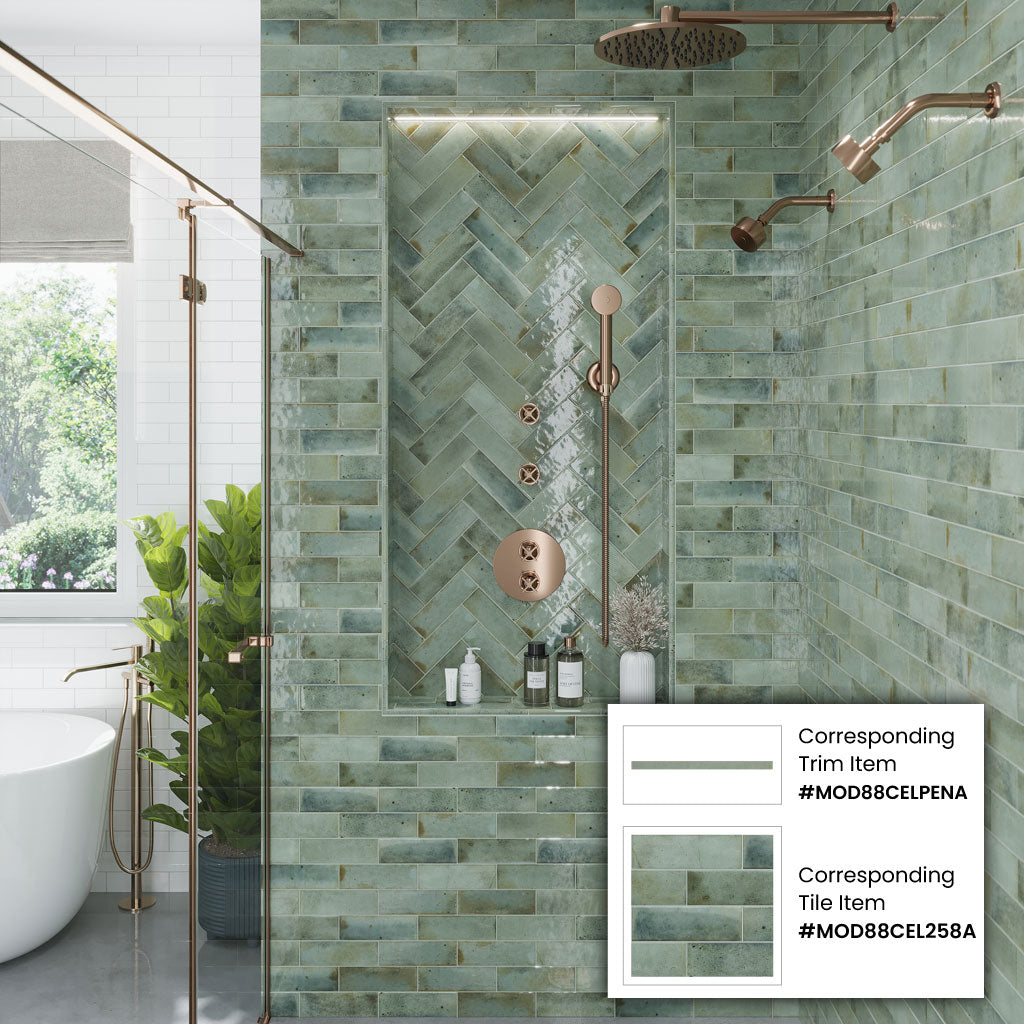
The color and finish of an edge profile can elevate the overall appearance of the tiled surface. Take a moment to think about the look you’re going for, and choose accordingly. Different types of tile trim are available in an array of hues, but some materials have fewer options than others. At Apollo Tile, our ceramic, glass, and marble trims offer the widest selection of colors, giving you the flexibility to match or contrast as desired.
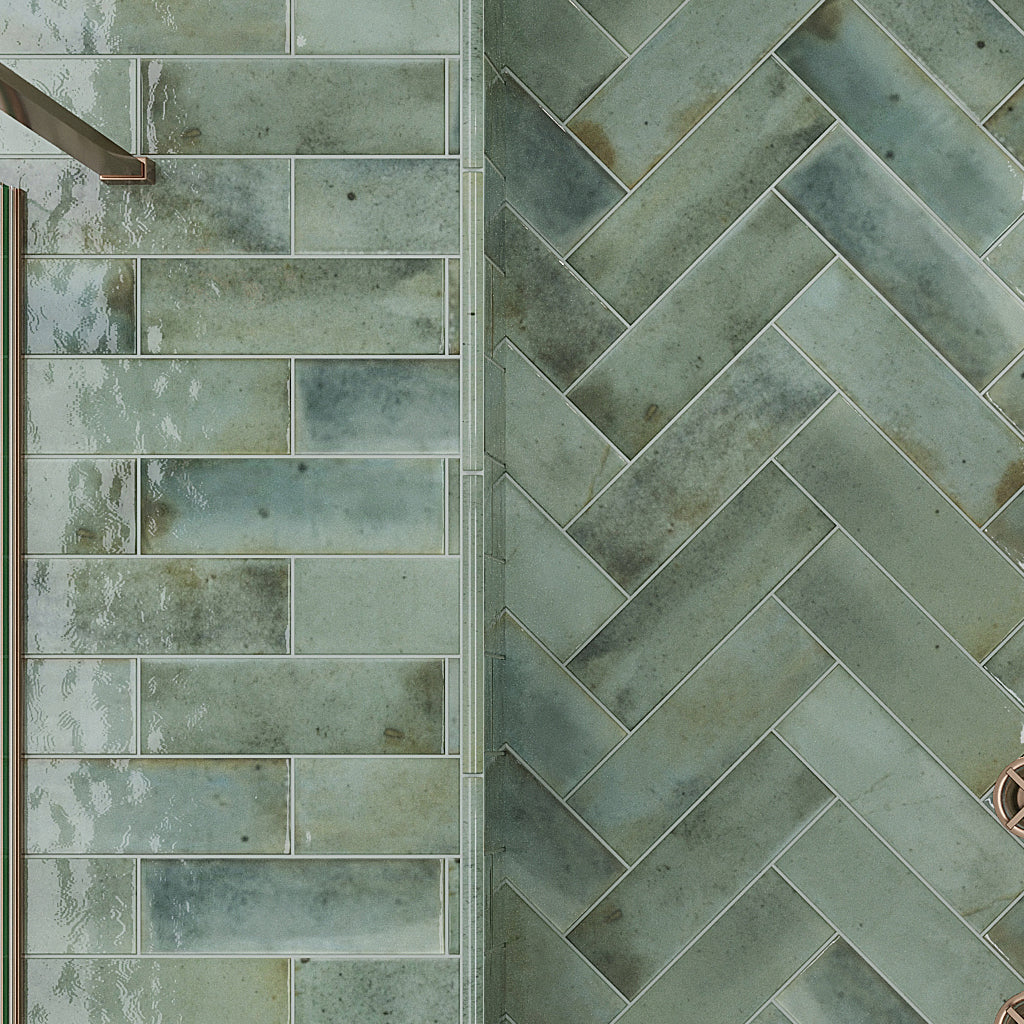
In most cases, homeowners opt to match trim material, color, and finish to the tile. For instance, our Sage Green 0.5x8 Glossy Ceramic Pencil Tile Trim can be used to frame the edges of Sage Green 2.5x8 Glossy Ceramic Subway Tile. Both are made from ceramic, come in a glossy finish, and exude artisanal appeal. Put simply, a seamless transition from tile to trim enhances visual flow better.
But trims can also serve as striking accents—it's all a matter of personal preference. Choosing a contrasting trim draws attention to the tile layout and emphasizes its pattern, all while adding a layer of depth and character to the scheme of things. Ultimately, whether you favor a seamless coordination or bold contrast, tile trim installation is the final flourish that brings your design together—both visually and functionally.
How to Install Tile Trim for a Professional Finish
Now we move on to how to install tile trim. To start, map out where the edge piece will go and keep the following steps in mind for the best results:
- Spread the adhesive with a notched trowel as you normally would, focusing on the area where the trim will be placed.
- To fit tile trim on an edge, firmly press it into the adhesive to the correct level so it sits flush to the tiles. If a trim piece is misaligned, gently pry it off and reposition it before the adhesive dries fully.
- If cuts are required, use a tile trim cutter. Measure accurately to avoid mistakes.
- Using tile spacers and a level during application can help ensure a straight, consistent alignment.
- Allow the adhesive to cure according to the manufacturer’s instructions, typically 24 hours, before beginning the grouting process. If installing marble tile finishing trim, the stone should be sealed before filling the joints with grout.
- If installing tile trim in a moisture-prone area, such as a bathroom backsplash or shower niche, leave a 1–2 mm gap between the trim and the tile. This allows for proper grouting and makes installation watertight.
Solving Common Tile Edge Problems with Tile Trim
Tile trim installation might seem like a minor detail, but a few common mistakes can have a big impact and undermine the finished look. One issue is misjudging the amount of trim needed, which can lead to excess waste or, worse, running out mid-project and experiencing frustrating delays.
Inaccurate cutting technique is another pitfall. Even being off by a fraction of an inch can produce uneven or jagged edges that ruin the clean lines the trim is meant to provide, as well as gaps that are hard to disguise.
Additionally, choosing the wrong style or profile that clashes with the intended tilework can disrupt the overall aesthetic or fail to offer proper protection to vulnerable edges. So, how do you avoid these common missteps when installing tile trim? First, always measure carefully and invest in about 10% more product than you expect to use to account for errors and cuts.
When cutting tile finishing trim, it’s important to use the right tools for the job so you can get clean, precise edges. Lastly, ensure your trim choice complements both the tiled surface and the overall design aesthetic to maintain a sense of cohesion.
Conclusion
Tile finishing trim may be a small detail, but it can greatly enhance the aesthetics and longevity of your tilework. Whether you prefer sleek, modern pencil flat liner or ornate chair rail, installing tile trim as a finishing or decorative detail can take your project to new heights. Consider the area of application, design goals, and functional needs when selecting the perfect profile.